I just had to share with you a really great article I just found on one of my favorite sites.
It's all about making the month of December a little easier for the master chef in your house, which would be me, in this case. See how I manage to make things all about me!
The concept is you make a meal, double the recipe and freeze the second one to have on another day in December. That way, when real life takes over and you are busy running from Christmas concerts, to hockey practice to volleyball tournaments to hockey games, to work, to the mall, there will be no excuse for 'take-out'.
Then the only thing you will need to do is remember to 'take-out' your already prepared meal from the freezer!
Keep the recipes simple, and comforting, like chili and stew.
Essentially you will cook for a week or two and eat for a month!
That, my friend, sounds like a great plan to me.
Here's the link: http://simplemom.net/3-weeks-till-christmas-menu-plan-batch-cook-for-december/ if you want to see for yourself how it's done.
I will be posting my version, once I get around to figuring out my menu.
Oh and by the way, the Kraft challenge was a bit of a flop. Not only did it cost quite a bit more, but the recipes weren't all that great.
Some did pass the "picky person" test. However, the rest of us had to suffer a bit.
I did however, like the lunch ideas.
I think I have mentioned before how much I can't stand making lunches.
If I haven't mentioned it before, I can't stand making lunches!
Monday, November 29, 2010
Tuesday, November 23, 2010

Here's an easy solution I came up with and it's been working really well of us.
My kids love
They are smoothie packs.
I admit the photo isn't too appetizing, however having these little packages ready and in your freezer, will soon become your friend.
What I do is measure out about a weeks worth of ingredients in little ziplocs.
In each bag will be a couple of fruits (I use varying combinations of frozen mango, raspberries, strawberries) and a chopped banana, 1/4 cup of wheat germ, 1 tbsp protein powder.
The boys just grab a bag out of the freezer and I blend the contents with 1 cup of yogurt and 1/2 cup of orange juice and sometimes a drizzle of honey.
The juice and yogurt can also be poured into ice cube trays and when frozen they can be popped out of the trays and added to the bags.
Then blend baby, blend!
There is no need to thaw, but if you prefer to throw the contents into the blender so they thaw in there, that way you don't lose any of the juices.
I set up an assembly line on my counter and make enough for both boys for the week.
A quick, healthy snack, packed full of goodness and provides lots of energy.
My little hockey players love them!!!
Monday, November 22, 2010

What better way to start your Monday morning, than with this!!
I have to admit I am a chocolate lover, but this little beauty is tangy and sweet and soft and a bit gooey and just fabulous.
I just had to share the recipe so you can start your week off right!
Raspberry Citrus Bars
Crust
1 cup butter (room temperature)
1/2 cup sifted icing sugar
2 cups all purpose flour
Filling
4 large eggs
1 1/2 cups granulated sugar
1/3 cup fresh lemon juice
1/4 cup all purpose flour
1/2 tsp baking powder
2 tbsp grated lemon zest
1 1/2 cups fresh raspberries (blueberries would also be good)
Sifted icing sugar
For the Crust
In a large bowl, beat butter until creamy. Add icing sugar and beat until combine. Beat in flour until crumbly. Press mixture on to the bottom of parchment paper lined 9x13 pan. Bake at 350 degrees for 20 minutes or until golden around the edges.
Filling
Meanwhile, beat eggs, granulated sugar and lemon juice. Combine flour and baking powder, stir into eggs mixture. Add lemon zest.
Sprinkle berries on the crust. Pour filling over berries, arranging the berries evenly with a spoon. Bake for 30 to 35 minutes or until lightly browned around the edges and the centre appears set. Run knife around the edges.
Cool completely in the pan on a rack.
To serve, dust with icing sugar.
Shown here with a big dollop of whipped cream.
Makes 32 bars
Is it just me, or is that one little crumb annoying anyone else?
Wednesday, November 17, 2010
December Daily 2010

As you can see each page acts as an introduction to the day and on some of the pages you can see the date peeking through.
The front and back covers are pieces of cardboard, which I painted white and glued a piece of the vellum with the white circles on one side and gold pinecone patterned paper from Anna Griffin on the inside.
I will be using 3 binder rings to secure the album once it's finished.


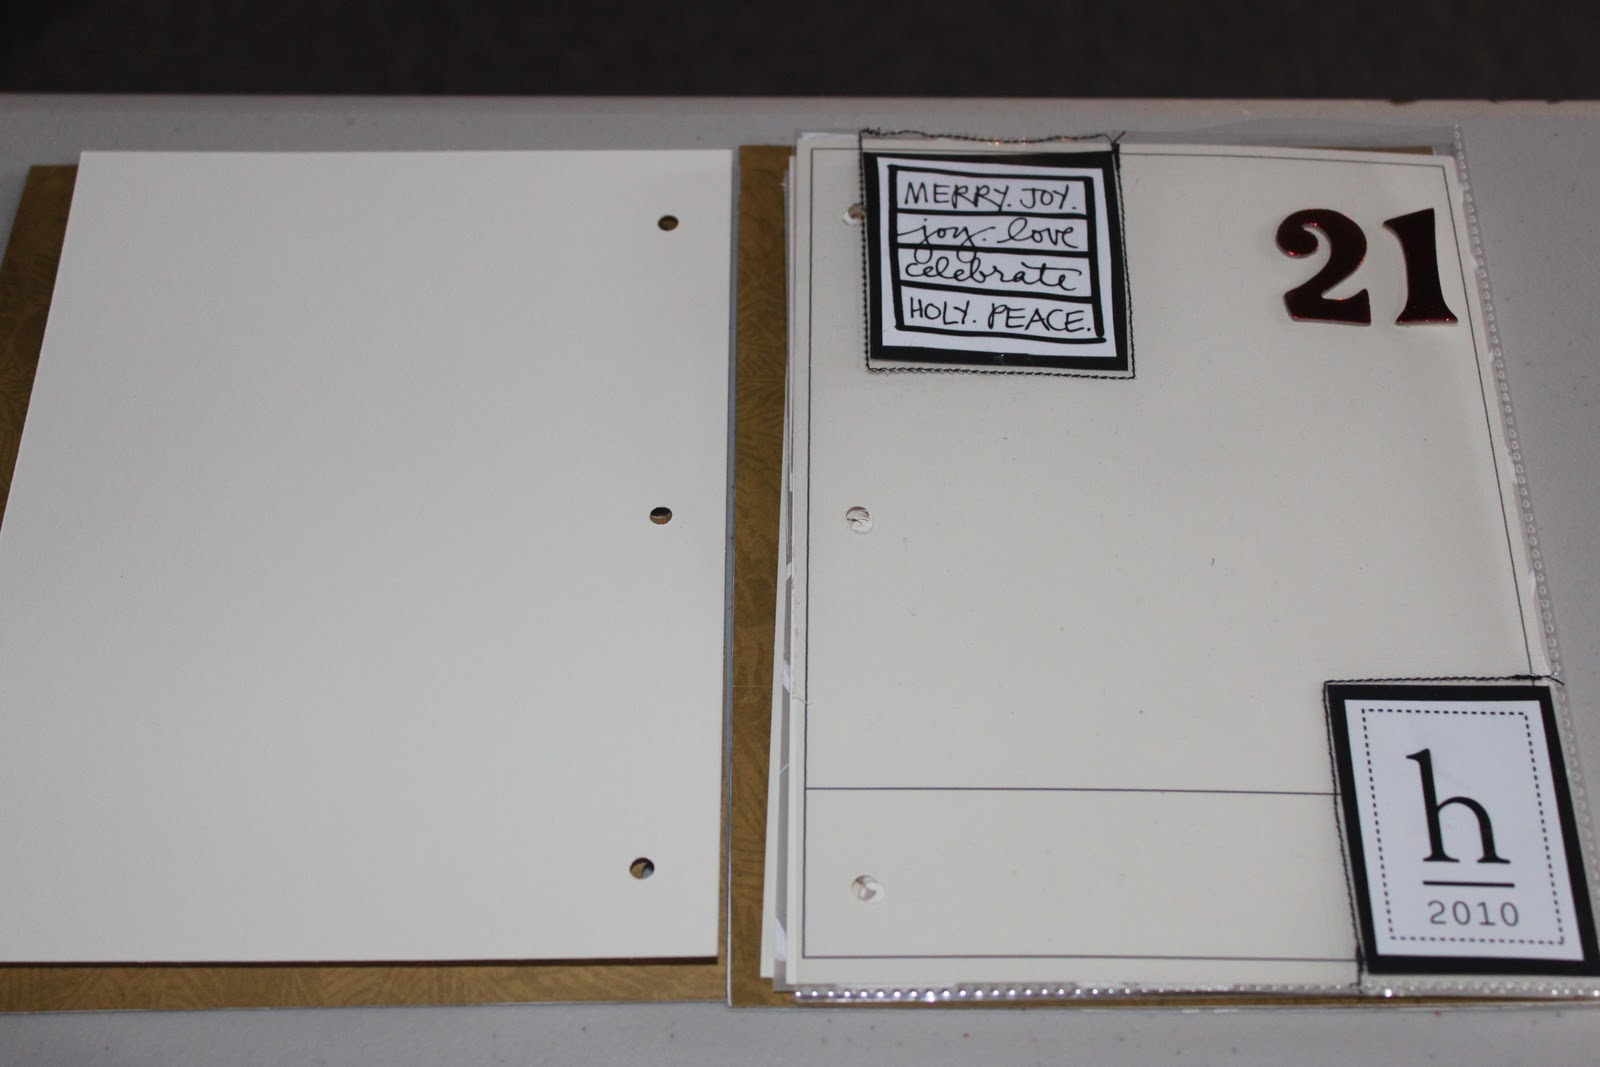


I bought the rhinestone words HoHoHo at Michaels and printed the number 12 from Designer Digitals, designed by Ali Edwards.


I stitched little pockets into a regular photo album page protector. My son Ciaran painted the little wooden stars.


This is one of the overlays I downloaded from Designer Digitals, designed by K.Pertiet

When I first saw Ali's album I wanted to create it exactly the way she had done.
I love everything about her album and it was my taste to a "T".
However, I was a little heartbroken when I couldn't find any of the supplies.
I am really happy how it's turned out in the end.
Considering I was "supply challenged" at times, it really forced me to use what I had to get a little creative.
After all, that's what it's all about. Right?
So it's Wednesday. It's payday. Which means the dreaded trip to the grocery store. Hubby's turn!
Actually, going to buy groceries doesn't bother me as much as unloading groceries.
I really don't enjoy that job!!
I really don't enjoy that job!!
Anyway, for this weeks menu, since I am lacking in inspiration, I thought I would cheat, a lot, and print off one of the 1 bag, 5 meal wonders from the Kraft Canada website.
I haven't done this before, usually because I am not a fan of pre-packaged foods. I prefer to make everything from scratch.
That said, this week is an experiment. Not only to save money, but also to test my family. Little do they know they are going to be part of this little experiment.
That is, is it worth spending a ton of money, a ton of time in the kitchen preparing something fancy for a 5 year old to have a hissy fit every single night. I am thinking NOT.....so Mac and Cheese it is!
Well actually, it is a bit better than Mac and Cheese.
Here's the menu for dinner and lunches (there's a 1 bag, 5 lunches menu too).
Thursday
Asian Beef Stir Fry - Chopped salad (should go over well with Ciaran, who am I kidding???)
Friday
Friday
Homemade pizza - Cheddar-Veg. tortillas for lunch
Saturday
?
Sunday
?
Monday
Garlic Steak and Onions - Cheddar and chicken club for lunch
Tuesday
Pork Medallions with Cranberry Stuffing - hot lunch at school (man, I love this day)
Wednesday
Mediterranean Chicken - Italian Sub Sandwiches for lunch
I can't wait to see how much this costs. I will be picking up staples like eggs, butter, bread, milk, fruit and egg whites (can't live without those).
Remember $200 is the budget.
I think I will do well this week.
I will let you know.
Oh, and I am going to be making Cranberry Bliss Bars too, you know....the ones from Starbucks!!
Can't wait, I love them!
Nothing says Christmas to me more than a Cranberry Bliss Bar and a Gingerbread Latte, ah.....heaven!!!
Hope you find a little piece of heaven today!
Nothing says Christmas to me more than a Cranberry Bliss Bar and a Gingerbread Latte, ah.....heaven!!!
Hope you find a little piece of heaven today!

Tuesday, November 16, 2010
Monday, November 15, 2010
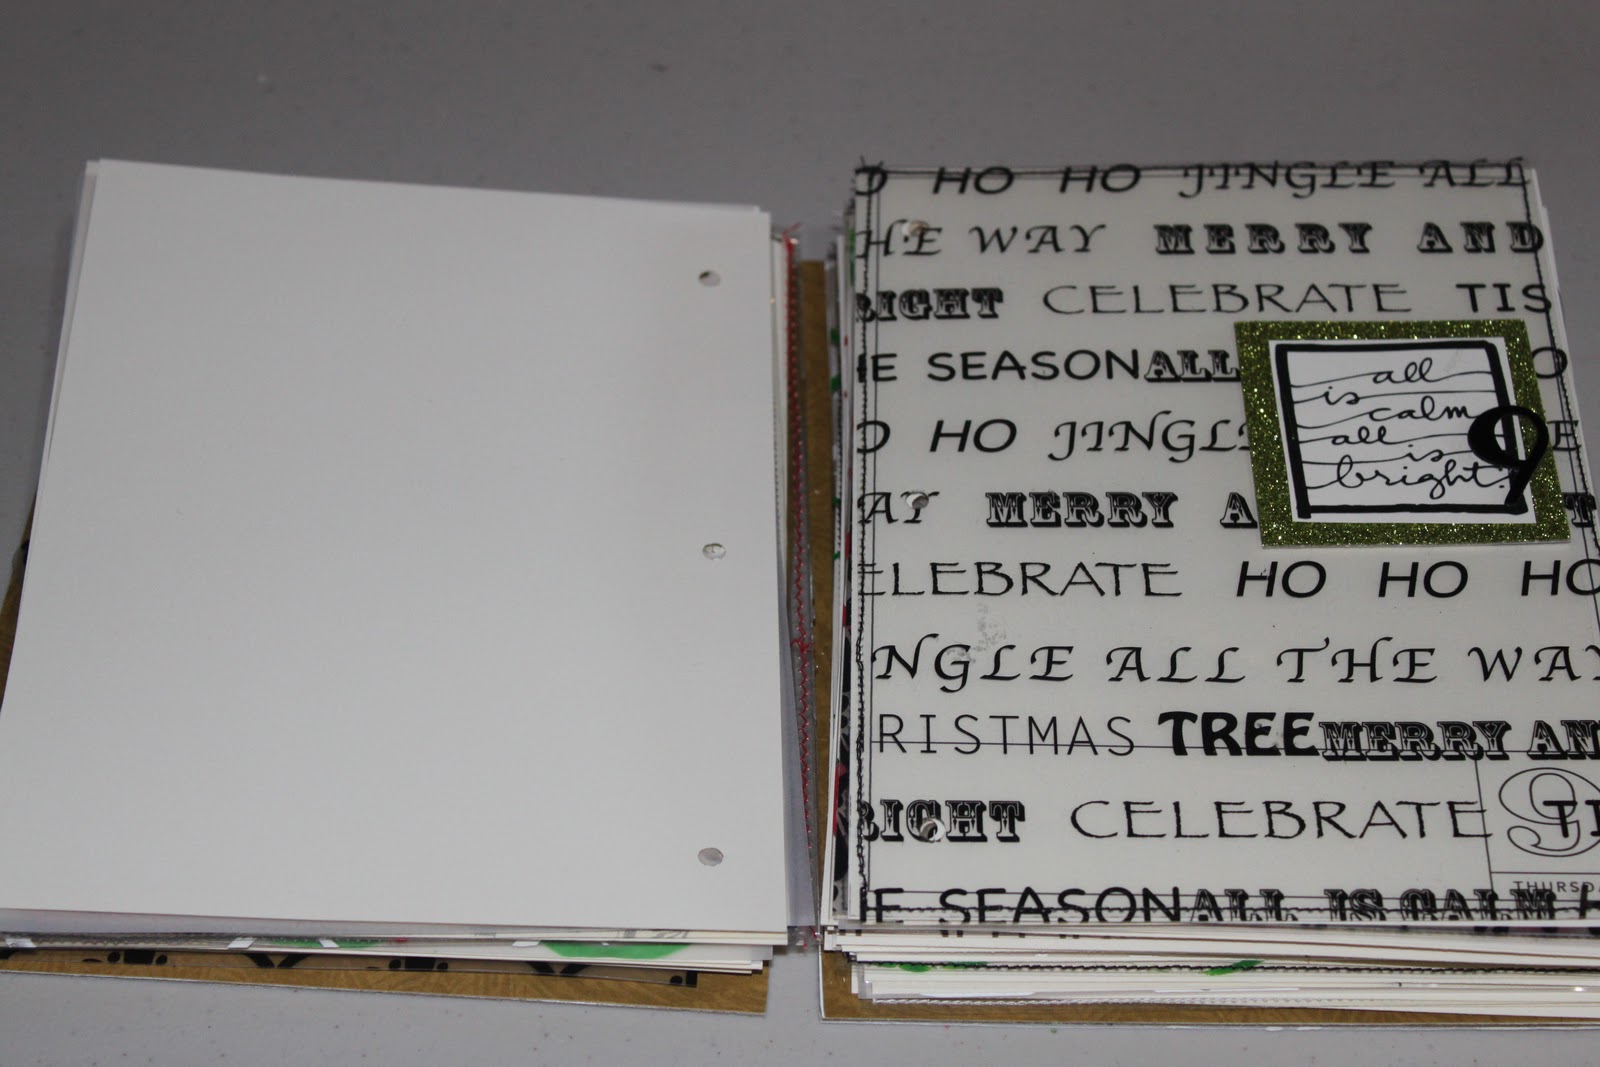
I have been working on my December Daily 2010 album. I think it's ready for December to roll around and I can't wait to start filling it with goodies!!
Here's a photo of my transparencies. I couldn't find any of the ones that Ali Edwards used in her album.
So, I had to get creative and make my own.
With a little paint, some overhead transparency sheets and my printer, I was able to come close to what she did....oh, and a fistful of glitter, because that makes everything better!

The transparency sheets that I had were pretty thin so I stitched two together, this made them a bit sturdier.
I ended up using a combination of thick vellum sheets and transparencies for my pages.
The transparencies will act as an introduction to the day and will be followed by a 6 x 8 printed photo or series of photos using Ali's templates, which I talk about later.
A very special thank you to Ali Edwards, Ormolu, KPertiet and ArtWHSE for their wonderful creations that assisted me greatly.
Have I mentioned today how much I love Ali Edwards????

Speaking of Ali, these are her 6 x 8 template overlays for each day of December.
They can be purchased and downloaded from Designer Digitals.
She also released this weekend, a series of 6 x 8 layered templates to help create your layouts.
Check out her website at aliedwards.com for a tutorials if you plan to use her templates.
The overlays can be printed as I have done and your photos can be adhered to each page. Or they can be used as an overlay on top of your photo, using Photoshop Elements and then printed at home or your local photo lab.
I will be doing a hybrid album, meaning some days I will print the photo and adhere to these pages and some I will be using Photoshop Elements 8.
These templates can be sized depending on the size of the album you are using.
I chose to do what Ali is doing this year and made a front and back cover out of scrap cardboard and adhered patterned paper and will be using binder rings to tie it all together.
This works well as sometimes you can outgrow a regular album pretty quick. With the printed templates and my transparencies my album is already 2 inches thick.
This is before I include the cotton ball snowman I am sure Ciaran will be making for me this year.
Feel free to contact me if you have any questions about how to get started on your December Daily 2010 album.
Tuesday, November 9, 2010
Advent Calendar

So my Advent Calendar this year will consist of these homemade envelopes made out of patterned Christmas paper, filled with tiny little hand drawn framed cards (tutorial available at aliedwards.com, plus there's a link for the download)
I downloaded the link at Designer Digitals, printed the cards on photo paper, glued patterned paper onto the back of the sheet of cards, and punched each frame with a 2.5" square punch.
Then taking a black Slick Writer pen, I wrote little tasks for my boys to enjoy.
They will be planting paperwhites, shopping for real mistletoe, making cards for their teachers, and decorating a gingerbread house.
One little task for each day in December.
I will be hanging the envelopes from ribbon and stringing them across my mantel.
I think the boys are going to love this.
I have to remember to check the calendar and number the cards in such way that the tasks won't interfere with other activities we have going on.
These little cards will be great to add to, and provide a little story for my next project, the December Daily album.
Thanks again to Ali Edwards for the inspiration.
Check out Ali's album....the foundation is already for her photos and stories.
I provided a link at the top of my page (little blue square). The photo didn't load properly, however if you click on it, it will take you to Ali's December Daily link.
Even though December is a busy month, the album comes together quickly, but the key to it's success is to have the foundation pages made in advance.
Then when the time comes you just have to insert your photos and stories.
Great ideas for the album include: photos, shopping lists, letters to Santa, artwork, a collage of Christmas cards, program from Christmas concert, Christmas music playlist, recipes, everyday stories and traditions.
I made my first album last year and it's great to look back, however I have learned so much this year, and Santa brought me a new camera last year!
So that I am expecting this year's album to be much bigger and better and I can't wait to get started.
Ali Edwards
So, Ali Edwards.
She is a graphic designer who lives in Oregon and she is amazing. I love her work! I love how simple her projects are. Simple in they way they look, perhaps clean is a better way of describing it.
I love scrap booking, but hate all the frills. I want my photos to tell the story not stickers and buttons and frilly stuff.
Ali Edwards does just that. She does hybrid scrap booking, which interests me. Meaning that she does digital scrap booking, as well as the regular type using paper and glue.
Anyway, she always has great photos, stories, downloads of her new designs, workshops, tutorials and lots of inspiration.
One of her projects was a downloadable, self paced class for making a Halloween Mini Album. I love the concept of a mini album. I actually did this and managed to get my book completed within a week of the event.
It's also not so daunting of a task, keeping it small and simple.
The downside I have found it seeing something amazing that Ali creates, wanting to replicate it exactly, but unable to find the supplies here in Canada.....why, why, why!!!
I believe she buys things online, but it seems as soon as she mentions it on her website, it sells out!!!
So, you may have to get creative. I couldn't find the album Ali used for her Halloween Mini, so I made my own.
I cut cardboard the size I wanted, painted it black, 2 coats of mod podge and a metallic cobweb, 2 binder rings and lined it with patterned paper. There you have it....an album.
Using everything I had laying around in my basement.
The album consists of 2 pages for journalling, 40 photos, and 20 transparency pages.
The transparency pages were hard to find.
Ali uses Hambly transparencies. They are sturdy and not floppy. They cost $25 to ship 4 sheets to Canada, if buying online....ah....not going to happen.
So I got creative and sewed 2 regular sheets together with a sticker or saying or something in between. Once again stuff from my basement.
Anyway, here are a few photos of my album and the link if you wish to purchase the download from Ali to make your own.
Let me know if you have any questions, or would like to see more of my album.


Next up: Advent calendar
She is a graphic designer who lives in Oregon and she is amazing. I love her work! I love how simple her projects are. Simple in they way they look, perhaps clean is a better way of describing it.
I love scrap booking, but hate all the frills. I want my photos to tell the story not stickers and buttons and frilly stuff.
Ali Edwards does just that. She does hybrid scrap booking, which interests me. Meaning that she does digital scrap booking, as well as the regular type using paper and glue.
Anyway, she always has great photos, stories, downloads of her new designs, workshops, tutorials and lots of inspiration.
One of her projects was a downloadable, self paced class for making a Halloween Mini Album. I love the concept of a mini album. I actually did this and managed to get my book completed within a week of the event.
It's also not so daunting of a task, keeping it small and simple.
The downside I have found it seeing something amazing that Ali creates, wanting to replicate it exactly, but unable to find the supplies here in Canada.....why, why, why!!!
I believe she buys things online, but it seems as soon as she mentions it on her website, it sells out!!!
So, you may have to get creative. I couldn't find the album Ali used for her Halloween Mini, so I made my own.
I cut cardboard the size I wanted, painted it black, 2 coats of mod podge and a metallic cobweb, 2 binder rings and lined it with patterned paper. There you have it....an album.
Using everything I had laying around in my basement.
The album consists of 2 pages for journalling, 40 photos, and 20 transparency pages.
The transparency pages were hard to find.
Ali uses Hambly transparencies. They are sturdy and not floppy. They cost $25 to ship 4 sheets to Canada, if buying online....ah....not going to happen.
So I got creative and sewed 2 regular sheets together with a sticker or saying or something in between. Once again stuff from my basement.
Anyway, here are a few photos of my album and the link if you wish to purchase the download from Ali to make your own.
Let me know if you have any questions, or would like to see more of my album.


http://aliedwards.com/shop/ae-workshop-001-halloween-minibook
Mexican Chicken

So this one really does go down as one of the easiest meals with the biggest bang!
All you need is chicken breasts (I bought skin on, bone in and remove all that nonsense myself....it's at least $10 cheaper to buy them this way and takes less than 5 minutes to do it yourself)
No measurements here folks just do it how you prefer.
A jar of salsa
A can of black beans
1 cup of grated cheese
Brown chicken breasts in an oven proof pan
Pour over the salsa
Pour over the black beans
sprinkle with half the grated cheese
Place in a 375 degree oven covered with foil for 20 minutes
Remove the foil, add the rest of the cheese and bake for 5 minutes more uncovered
Enjoy with flour tortillas and s, sc and g (salsa, sour cream, guacamole)
Really easy, really fast (less than 30 minutes from fridge to table) and so tasty!
My picky eater, (I won't mention his name) refused to come to the table.
He flopped himself on the floor and said "who ever thought of putting chicken in a taco".
We all ranted a raved about how good it was and finally, after much persuasion he took one bite.
By the way, he ate the entire taco and loved it!!
I little bribing with a homemade blueberry muffin didn't hurt either.
Enjoy!
Next, onto the braised beef.

My hubby found this recipe in a men's magazine ages ago....and I mean ages!
He held onto it and has said on numerous occasions that I should make it for him.
Like everything else, on numerous occasions, I have just ignored him.
This week though we were doing a little "spring cleaning", he found the magazine, tore out the recipe and it finally made it's way onto my kitchen counter.
Feeling the need for a little comfort food myself, I decided to go ahead and make him the recipe he's been waiting for since May 2009. (See how it really is all about me)
So it's not really a recipe, it's more about the process of braising meat.
Braising is a great way to feed a hungry family of meat eating men, on the cheap.
Braising takes cheaper cuts of meat that are generally too tough to eat any other way, and turns them into heaven on a plate.
But, it also takes time. Take the time to enjoy the aroma, take the time to feel the passion that is building in your kitchen, take the time to go redecorate a bedroom....because it's a long process!!!
First, THE MEAT!
The recipe, or should I say, the process, says to pick sinewy cuts such as pork shoulder, lamb shank or beef chuck. Once you have mastered this process you can substitute whatever meat of veg you want and the end result will be a crowd pleaser.
I chose an Inside Round roast at the recommendation of the butcher. It cost $18, which to me, was not cheap. Anyway, it cut into 2" chunks nicely and did provide an great end result.
So first, chop 1 carrot, 1 stalk of celery, and 1 onion and place in a large pot (with a lid). I used my cast iron dutch oven.
Add, springs of fresh thyme, a bay leaf, parsley some peppercorns and a whole head of garlic, cut in half.
Then add a cheap bottle of red wine. The whole bottle!!! No sneaking a swig, it's too early to drink!
Simmer until all the wine has evaporated and you are left with syrupy glazed veggies
Add another carrot, onion and stalk of celery and set aside.
Next, THE MEAT
Cut into 2" cubes, pat dry with a paper towel, season with salt and pepper and dredge in flour. The flour keeps the meat dry, because wet meat will not brown in a pan, and the browning gives it a lot flavor.
Add a few tablespoons of canola oil to a frying pan and brown the meat cubes on all sides. Don't burn the meat, but you really want a rich dark brown color.
Once browned, placed the meat on top of the vegetables and add enough beef stock to surround the meat, do not cover the meat, just surround it.
Bring the pot to a simmer and place the lid on, not to completely cover the pot though.
Place in a 350 degree oven.
Simmer for 2 1/2 hours.
Once done, remove the meat and discard the vegetables. Strain the liquid over top of the meat and once cooled, place it in the fridge for 2 DAYS. Or longer, because braised meat gets better with age. So the longer it can still in the juice the better the flavor will be.
After 2 days, skim off any fat that has congealed on top, heat up your pot just enough to loosen the meat from the juices and remove the meat. Heat up the juices until it's a syrupy consistency.
Put the meat back into the juices and place in a 250 degree oven for 15 minutes to warm the meat through.
The meat is soft, tender, full of flavour.....hardly any chewing required.
I served the meat with Yorkshire pudding, mashed potatoes and steamed green beans.
It was amazing, truly amazing! Heaven on a plate!!
We only had enough for 2 servings of leftovers the following day.
It is a long process, a lot of back and forth with the meat, makes a bit of mess as far as dishes (but that's what husbands are for).
It's not difficult, and really does make a comfort food that you will crave!
Enjoy!

My hubby found this recipe in a men's magazine ages ago....and I mean ages!
He held onto it and has said on numerous occasions that I should make it for him.
Like everything else, on numerous occasions, I have just ignored him.
This week though we were doing a little "spring cleaning", he found the magazine, tore out the recipe and it finally made it's way onto my kitchen counter.
Feeling the need for a little comfort food myself, I decided to go ahead and make him the recipe he's been waiting for since May 2009. (See how it really is all about me)
So it's not really a recipe, it's more about the process of braising meat.
Braising is a great way to feed a hungry family of meat eating men, on the cheap.
Braising takes cheaper cuts of meat that are generally too tough to eat any other way, and turns them into heaven on a plate.
But, it also takes time. Take the time to enjoy the aroma, take the time to feel the passion that is building in your kitchen, take the time to go redecorate a bedroom....because it's a long process!!!
First, THE MEAT!
The recipe, or should I say, the process, says to pick sinewy cuts such as pork shoulder, lamb shank or beef chuck. Once you have mastered this process you can substitute whatever meat of veg you want and the end result will be a crowd pleaser.
I chose an Inside Round roast at the recommendation of the butcher. It cost $18, which to me, was not cheap. Anyway, it cut into 2" chunks nicely and did provide an great end result.
So first, chop 1 carrot, 1 stalk of celery, and 1 onion and place in a large pot (with a lid). I used my cast iron dutch oven.
Add, springs of fresh thyme, a bay leaf, parsley some peppercorns and a whole head of garlic, cut in half.
Then add a cheap bottle of red wine. The whole bottle!!! No sneaking a swig, it's too early to drink!
Simmer until all the wine has evaporated and you are left with syrupy glazed veggies
Add another carrot, onion and stalk of celery and set aside.
Next, THE MEAT
Cut into 2" cubes, pat dry with a paper towel, season with salt and pepper and dredge in flour. The flour keeps the meat dry, because wet meat will not brown in a pan, and the browning gives it a lot flavor.
Add a few tablespoons of canola oil to a frying pan and brown the meat cubes on all sides. Don't burn the meat, but you really want a rich dark brown color.
Once browned, placed the meat on top of the vegetables and add enough beef stock to surround the meat, do not cover the meat, just surround it.
Bring the pot to a simmer and place the lid on, not to completely cover the pot though.
Place in a 350 degree oven.
Simmer for 2 1/2 hours.
Once done, remove the meat and discard the vegetables. Strain the liquid over top of the meat and once cooled, place it in the fridge for 2 DAYS. Or longer, because braised meat gets better with age. So the longer it can still in the juice the better the flavor will be.
After 2 days, skim off any fat that has congealed on top, heat up your pot just enough to loosen the meat from the juices and remove the meat. Heat up the juices until it's a syrupy consistency.
Put the meat back into the juices and place in a 250 degree oven for 15 minutes to warm the meat through.
The meat is soft, tender, full of flavour.....hardly any chewing required.
I served the meat with Yorkshire pudding, mashed potatoes and steamed green beans.
It was amazing, truly amazing! Heaven on a plate!!
We only had enough for 2 servings of leftovers the following day.
It is a long process, a lot of back and forth with the meat, makes a bit of mess as far as dishes (but that's what husbands are for).
It's not difficult, and really does make a comfort food that you will crave!
Alright, so I have so much to get caught up on here.
First, my shopping trip last week cost me $247. So that meant $47 over budget. Not good.
I have to say though, in my defense, that there's been some pretty tasty meals served around these parts this week.
The braised beef.....big hit!!
The mexican chicken....big hit!!!
I will share those recipes with you since they are worth sharing.
I have also been hitting the craft room lately.
I have made a Halloween mini-album. Which I will show you and explain how, plus provide a wonderful link over at the Ali Edwards website (have I mentioned how much I love her?)
Also a great idea for an Advent Calendar...that doesn't involve chocolate.
I know what you are thinking. How dare I speak such words. Doesn't involve chocolate? What is wrong with me????
Seriously though, this year I wanted to do something more meaningful.
What I had decided to do was make little envelopes out of Christmas paper, and fill each one with a little task for the boys to do each day.
For example, visit Santa, or bake cookies, or donate toys, or go skating or create a Christmas story to read at bedtime.
Just little notes from me, to get the boys doing something to build a memory or perhaps create a new Christmas tradition.
Just like magic as I was planning my idea for this Advent Calendar, Ali Edwards created a download to make the little cards, in which you just have to write your task.
So much to tell you!!
Here goes the first thing.
Recipes for Jam Thumbprints and Whipped Shortbread as promised.
Jam Thumbprints
1 stick of butter (1/2 cup)
1/2 cup powdered sugar
1/4 tsp salt
1 tsp vanilla
1 1/4 cup all purpose flour
1/4 granulated sugar for rolling
Jam
Preheat oven to 350 degrees, and line a baking sheet with parchment or silicone mat
In a medium bowl, cream butter and powdered sugar, salt, and vanilla until smooth
Beat in the flour until it resembles crumbs.
Roll (squeeze) the dough into 1" balls and roll into granulated sugar.
Place 1" a part on the baking sheet, and bake for 10 minutes.
Remove from oven and make an indent in the middle of each cookie (use your finger tip or the end of a wooden spoon).
Return the cookies to the oven and bake for 8 minutes more.
Remove to a cooling rack. Once cooled, fill with your favorite jam.
Thanks to Sugarcrafter for the inspiration and recipe
Whipped Shortbread
1 cup butter
1 1/2 cups flour
1/2 powdered sugar
Preheat oven to 350 degrees
Combine all ingredients and beat for 10 minutes
Drop onto a cookie sheet using a teaspoon. I piped mine onto the cookie sheet using a piping bag with no tip.
Bake for 17 minutes or until slightly browned around the edges.
These cookies melt in your mouth and are quite delicate, and so delish.
I mean, butter and sugar.....how can you go wrong!!!
After 12 years of making these for my husband, he finally told me this year that he doesn't like them.
But thats just him, he's odd like that!!!
Anyway, I like them and the cook always wins!!!
Wednesday, November 3, 2010
51 Days Until Christmas!!
It's beginning to look a lot like Christmas!!
Well, in my kitchen anyway.
I made a couple of cookies recipes yesterday to put in the freezer.
Here are the photos, recipes will follow.
Jam Thumbprints
 and
and
Whipped Shortbread

Both recipes are super easy, and pretty much use the same ingredients.
So stay tuned for the recipes, I will post them both later today.
Also, here's the menu for this week.
Menu 3
Wednesday
Pad Thai
Thursday
Ribeye steak, rice and asparagus
Friday
Homemade Pizza
Saturday
Mexican chicken
Sunday
Well, in my kitchen anyway.
I made a couple of cookies recipes yesterday to put in the freezer.
Here are the photos, recipes will follow.
Jam Thumbprints

Whipped Shortbread

So stay tuned for the recipes, I will post them both later today.
Also, here's the menu for this week.
Menu 3
Wednesday
Pad Thai
Thursday
Ribeye steak, rice and asparagus
Friday
Homemade Pizza
Saturday
Mexican chicken
Sunday
Braised beef, mashed potatoes, green beans
Monday
Baked rigatoni with spinach and fontina cheese
Tuesday
Leftovers
Got my menu, my groceries list, and I am ready to hit the stores. Wish me luck.
Grocery budget for the week has to include pantry staples, household cleaners and supplies, plus food.
My budget is $200.....lets see how I do!
Subscribe to:
Comments (Atom)